


 Home
Home HOME
HOME Register
 Log in
 fire effect sinature
 Tue Aug 28, 2018 3:18 pm


Fire Effect Signature
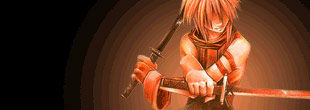
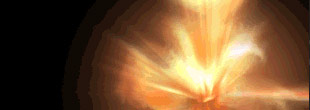
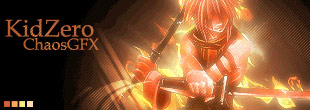
In this signature tutorial you will learn how to create the following signature. This is a beginner tutorial, so when you are just starting out with photoshop and keep getting stuck when you try to follow more advanced tutorials, this tutorial is for you! You will learn how to:
* Create a background using a radial gradient
* Create a fire like effect
* Use scanlines.
* And of course much more!
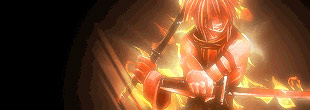
result
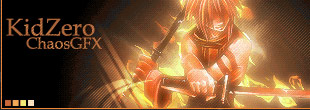
Looks good doesn’t it? So lets get started!
Resources
Before we start you will need:
* A render that fits the style of the signature we are going to make. A cartoon or anime render with some guns or swords works great! You can find great looking renders in our render gallery, or in any of the various render packs posted on the forums.
* An X-brush (you can download some here)
Creating the background
Lets start by creating an empty canvas, I picked a 310 px by 110 px canvas
Now select your paint bucket (G) and fill your canvas with black. After that we are going to add a radial gradient. Select the Gradient tool (G) (its hidden under the paint bucket tool) and now select the radial gradient option:
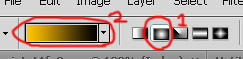
After you have selected the radial gradient option (1) click on (2) to create your own gradient! Now you will be able to choose one of the default gradients that come with photoshop, but you can also create your own gradient, which is what we will be doing.
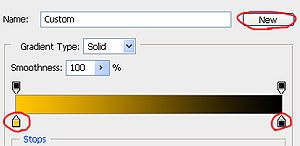
You can use the pointers I marked with red to create your own gradient, click on the pointers allows you to change the colors. You can also add more pointers by simply clicking somewhere on the gradient. Now add your radial gradient onto your canvas. Place it where you want your render to be. To add the radial gradient you will need to define 2 points using your mouse. To do this click somewhere on your canvas to define the center of your gradient. Now drag with your mouse and release it somewhere to define the second point. The distance between your 2 points is the radius of your gradient!

(your gradient probably looks a lot smoother, because I saved the picture in low quality)
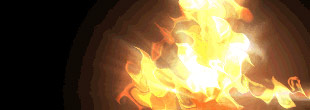
Creating the fire effect
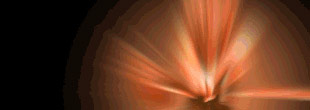
Ok now we have our background done its time to add in our render. Add your render and duplicate it 3 times (right click on the layer > duplicate), hide all render layers but one (to do this click on the little eye icon in front of the layer). You should now have 4 layers with your render on it, 3 are hidden from view, and 1 is still visible.
Render Effect #1
For our first effects wee are going to do a radial blur on the only visible render layer. Go to Filter > Blur > Radial Blur
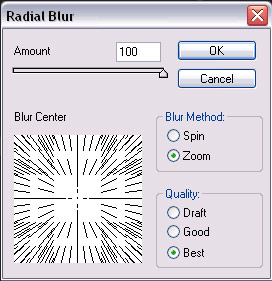
Do another radial blur on the same layer if you want. When you are happy with your radial blur sharpen this layer (Filter > Render > Sharpen)
Render Effect #2
Now make one of your other hidden render layers visible, we are going to add a different effect to this one! Open the Smudge Tool and select the X brush (you can download it at the start of the tutorial). In the brush manager, use the following smudge settings:
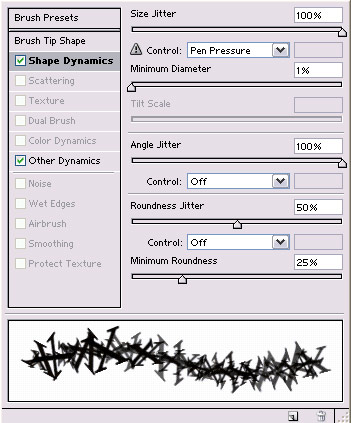
Now smudge your render and set that layer to lineair dodge.
Render Effect #3
Make another render layer visible, time to add some nice effects to this layer as well! Ripple your render by going to Filter > Disort > Ripple
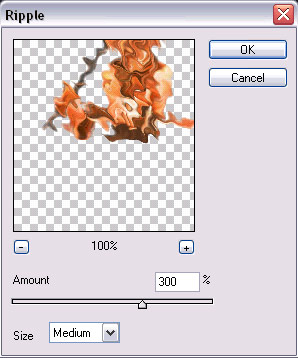
If you don’t like your result, ripple your render a couple of times until you think it looks good, now set the blending mode of this layer to color dodge.
Adding the render
Now make your last render layer visible, this will be our render so we won’t add effects to this one, just leave it like this.

As you can see it is beginning to look good already, but the render stands out a bit to much from the background. It doesn’t look like its part of the background yet. To fix this lets give the render some “glow” to blend in with the background. Create a new layer (ctrl+N) and go to (Image > Apply Image) now go to (Filter > Blur > Gaussian Blur) and use 3px as your setting. Set the blending mode of this layer to Lighten. As you can see the render now matches the background effects!
Creating flow
Our signature is beginning to look pretty good, so lets continue. Create a new layer and on add some white rectangles on it using the marquee tool (first make a selection than fill it with the paint bucket tool).

Now rotate these rectangles by going to edit > transform > rotate.

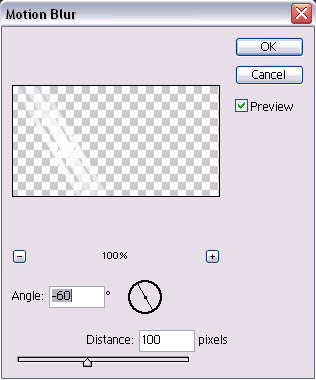
Go to Filter > Blur > Motion Blur
Now move this layer around untill its on a position where you like it. Set the blending mode of this layer to overlay, or any of the other blending modes. Just try one that looks good!
Duplicate this layer and use a polar disort filter. (Filter > Disort > Polar Coordinates > Rectangular to polar) Place it near the other layer.
Finishing the signature
The signature is now almost finished, all we need to do is add a border and some text! For the text I used standard windows font, just pick one you like yourself. Verdana or arial always looks good! I picked a color that matches my signature, and placed it on the left to fill the empty space.
Try to make your text easy to read, so don’t make it really small and hide it in a corner! You will also need to make sure that you don’t make the text to big, if its to big it is really distracting and drawing away focus from your render and the cool effects.
The bottom left part of the signature is a bit empty, so lets add something really simple to fill up the empty canvas! On a new layer select the marquee tool and while holding shift, make a small square. Now use your eyedropper tool to select a color from your signature and fill your selection with this. Now duplicate this square 3 times, and after that change the colors. Here is my result:
To create a border make a new layer (ctrl+N) and than select the entire canvas using ctrl+A. Now go to edit > stroke and use 1px and a color that matches your signature. Click ok and you should have a really simple but great looking border around your signature!
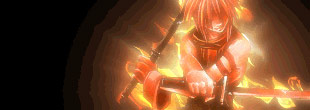
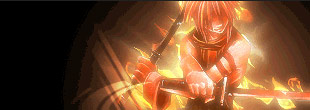
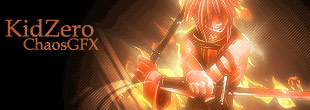
Here is my final result:
result
credit to deviantart page (scully7491.deviantart.com).
salamat po sa original uploader nito nakuha ko lng sa net
ok po itong tutorial n toh,,,na try ko n po sya...simple and nice!!
paki delete n lng po kng repost....thanx if u like my post...
In this signature tutorial you will learn how to create the following signature. This is a beginner tutorial, so when you are just starting out with photoshop and keep getting stuck when you try to follow more advanced tutorials, this tutorial is for you! You will learn how to:
* Create a background using a radial gradient
* Create a fire like effect
* Use scanlines.
* And of course much more!
result
Looks good doesn’t it? So lets get started!
Resources
Before we start you will need:
* A render that fits the style of the signature we are going to make. A cartoon or anime render with some guns or swords works great! You can find great looking renders in our render gallery, or in any of the various render packs posted on the forums.
* An X-brush (you can download some here)
Creating the background
Lets start by creating an empty canvas, I picked a 310 px by 110 px canvas
Now select your paint bucket (G) and fill your canvas with black. After that we are going to add a radial gradient. Select the Gradient tool (G) (its hidden under the paint bucket tool) and now select the radial gradient option:
After you have selected the radial gradient option (1) click on (2) to create your own gradient! Now you will be able to choose one of the default gradients that come with photoshop, but you can also create your own gradient, which is what we will be doing.
You can use the pointers I marked with red to create your own gradient, click on the pointers allows you to change the colors. You can also add more pointers by simply clicking somewhere on the gradient. Now add your radial gradient onto your canvas. Place it where you want your render to be. To add the radial gradient you will need to define 2 points using your mouse. To do this click somewhere on your canvas to define the center of your gradient. Now drag with your mouse and release it somewhere to define the second point. The distance between your 2 points is the radius of your gradient!
(your gradient probably looks a lot smoother, because I saved the picture in low quality)
Creating the fire effect
Ok now we have our background done its time to add in our render. Add your render and duplicate it 3 times (right click on the layer > duplicate), hide all render layers but one (to do this click on the little eye icon in front of the layer). You should now have 4 layers with your render on it, 3 are hidden from view, and 1 is still visible.
Render Effect #1
For our first effects wee are going to do a radial blur on the only visible render layer. Go to Filter > Blur > Radial Blur
Do another radial blur on the same layer if you want. When you are happy with your radial blur sharpen this layer (Filter > Render > Sharpen)
Render Effect #2
Now make one of your other hidden render layers visible, we are going to add a different effect to this one! Open the Smudge Tool and select the X brush (you can download it at the start of the tutorial). In the brush manager, use the following smudge settings:
Now smudge your render and set that layer to lineair dodge.
Render Effect #3
Make another render layer visible, time to add some nice effects to this layer as well! Ripple your render by going to Filter > Disort > Ripple
If you don’t like your result, ripple your render a couple of times until you think it looks good, now set the blending mode of this layer to color dodge.
Adding the render
Now make your last render layer visible, this will be our render so we won’t add effects to this one, just leave it like this.
As you can see it is beginning to look good already, but the render stands out a bit to much from the background. It doesn’t look like its part of the background yet. To fix this lets give the render some “glow” to blend in with the background. Create a new layer (ctrl+N) and go to (Image > Apply Image) now go to (Filter > Blur > Gaussian Blur) and use 3px as your setting. Set the blending mode of this layer to Lighten. As you can see the render now matches the background effects!
Creating flow
Our signature is beginning to look pretty good, so lets continue. Create a new layer and on add some white rectangles on it using the marquee tool (first make a selection than fill it with the paint bucket tool).
Now rotate these rectangles by going to edit > transform > rotate.
Go to Filter > Blur > Motion Blur
Now move this layer around untill its on a position where you like it. Set the blending mode of this layer to overlay, or any of the other blending modes. Just try one that looks good!
Duplicate this layer and use a polar disort filter. (Filter > Disort > Polar Coordinates > Rectangular to polar) Place it near the other layer.
Finishing the signature
The signature is now almost finished, all we need to do is add a border and some text! For the text I used standard windows font, just pick one you like yourself. Verdana or arial always looks good! I picked a color that matches my signature, and placed it on the left to fill the empty space.
Try to make your text easy to read, so don’t make it really small and hide it in a corner! You will also need to make sure that you don’t make the text to big, if its to big it is really distracting and drawing away focus from your render and the cool effects.
The bottom left part of the signature is a bit empty, so lets add something really simple to fill up the empty canvas! On a new layer select the marquee tool and while holding shift, make a small square. Now use your eyedropper tool to select a color from your signature and fill your selection with this. Now duplicate this square 3 times, and after that change the colors. Here is my result:
To create a border make a new layer (ctrl+N) and than select the entire canvas using ctrl+A. Now go to edit > stroke and use 1px and a color that matches your signature. Click ok and you should have a really simple but great looking border around your signature!
Here is my final result:
result
credit to deviantart page (scully7491.deviantart.com).
salamat po sa original uploader nito nakuha ko lng sa net
ok po itong tutorial n toh,,,na try ko n po sya...simple and nice!!
paki delete n lng po kng repost....thanx if u like my post...